Playwright is a relatively new test automation framework that has gained traction in recent years. This article features the most essential information about Playwright, its setup, pros and cons, and how it differs from its competitors. Let’s start!
What is Playwright
Playwright is a modern test automation framework for end-to-end testing that enables developers to ensure the robustness and reliability of their web applications. Developed by Microsoft, Playwright is designed to meet the demands of today's whole web development process. It offers cross-platform, cross-language, and cross-browser support as well as mobile testing and parallel execution for increased testing speed, making Playwright one of the most promising tools for the future.

The graph, prepared by npmtrends.com, indicates a little stagnation in download counts for Cypress whereas Playwright, on the other hand, is showing signs of exponential growth, overtaking Selenium WebDriver in recent months. There is still a huge gap in downloads between Cypress and Playwright, but bearing in mind Cypress was released a few years ahead and given that Playwright gives users more freedom, does not force the use of paid solutions, and has fewer architectural limitations, it might take Cypress’s place in the leadership position in the upcoming years.
>> Learn more about test automation services by CodiLime.
Sections after ‘Project setup’ contain a more descriptive overview of Playwright without any coding use the table of contents for quicker navigation.
Project setup
Playwright supports many programming languages, including Java, Python, and C#. However, for this project example, TypeScript has been chosen as this API has the greater support.
Prerequisites:
- LTS (long-term support) node installed - this project was built on v18.17.1
- Visual Studio Code as IDE (recommended)
- Visual Studio Code extension Playwright Test for VSCode - official Microsoft release (recommended)
Open IDE with your terminal of choice at the project location and run:
- npm init playwright, the latest version, 1.38.0, will be installed
This command will initialize the repository with Playwright installed, during the installation a few questions will be asked; this project uses all default options.
It will also download the browser binaries for Chromium, Firefox, and WebKit and store them in the node_modules directory, as they are required to execute tests.
Before adding TypeScript to the project, navigate inside the terminal to the project folder containing the package.json file:
- By default, a new folder will be named playwright, run cd playwright
- Add TypeScript, run npm i -D typescript
The newest version of TypeScript will be installed; at the time of writing this article it was 5.2.2.
At this point, the basic configuration of the Playwright repository is finished. One recommendation before running any tests is to replace the file playwright.config.ts:
  projects: [

    {

      name: 'chromium',

      use: { ...devices\['Desktop Chrome'] },

    },

  ],
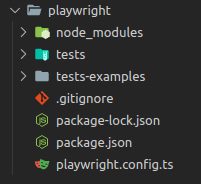
Overall, the Playwright project structure is very basic and comes down to a folder with tests and configuration files.

- node_modules contains installed modules ready to use,
- tests - is the folder where all Playwright tests will land,
- tests-examples - contains a few examples of basic tests (can be deleted),
- .gitignore - contains a list of files to be ignored by the version control system,
- package-lock.json and package.json contain information about package versions and their dependencies,
- playwright.config.ts contains the configuration of Playwright.
Running basic tests
Creating tests in Playwright is pretty straightforward, even though manipulation of configuration files to match project needs is possible, no additional work is required. The first test in this project will focus on validating the contact form on the https://codilime.com/contact/ page, where a user has to fill out their details - first name, last name and email - to be able to reach out to CodiLime for more information, and blank fields will throw an error on attempting to send.
Add a new file to the folder /tests named codilime_contact.spec.ts.
At the start, import the basic objects necessary to create the first test which is checking if it is possible to submit the form without completing all required fields…
import { test, expect } from '@playwright/test';
…and test that the form is currently is only navigating to https://codilime.com/contact/, the logic of the test will be filled in later on:
test('Submitting contact form without an email should ask for filling email field', async ({ page }) => {
await page.goto('https://codilime.com/contact/');
});
The core of any end-to-end testing tool is grabbing elements by their HTML attributes or the text they contain and executing actions on them, like filling with text or clicking.
Playwright allows multiple different methods of finding the desired elements, these are the most common:
- page.getByText() text content of an element.
- page.getByPlaceholder() placeholder of an ex. input field.
- page.getByTestId() element with data-testid attribute (other attributes can be configured).
- page.getByRole() explicit and implicit accessibility attributes, role locators include buttons, checkboxes, headings, links, lists, tables.
- page.locator() any other elements that are difficult to grab by any of the above methods, and a CSS or XPATH selector has to be used.
- Additional chain .nth() allows the selection of a specific element in case multiple same elements are found.
Complete the rest of the test, based on the listed methods. The selection of methods below are used to demonstrate them in action. In most cases, selectors more resilient to change can be used; follow the Playwright guide on best practices for more details:
await page.getByRole('button', { name: 'Accept All Cookies' }).click();
await page.getByPlaceholder('ex. John').fill('John');
await page.locator('input[name="lastname"]').fill('Doe');
await page.getByText('Get estimate').nth(1).click();
Top it with an assertion to give our test some usefulness.
await expect(page.getByText('Please complete this required field.')).toBeVisible();
State of the page at the end of the test with a positive result:

To execute available tests run:
- npx playwright test
This command will execute each test on the browsers specified in playwright.config.ts. By default, Playwright will execute tests on Chromium, Firefox, and WebKit, but for this article, we used only Chrome (see the ‘Project setup’ section).
If everything works correctly, information about one passing test should be visible in the terminal.
Additionally, it is possible to view test reports by running npx playwright show-report enabling you to check detailed information about test runs locally.
Debugging
-
With VSC, with the Playwright Test for VSCode extension installed, it is possible to select a specific test and run it in debug mode, allowing the user to set breakpoints, rerun the test, or run it step by step.
Fig.4: Debugging
-
Using the mentioned UI mode for live debugging with access to the browser’s dev tools.
-
Trace Viewer is another handy tool similar to UI mode, but it records everything to a file and allows one to review the test run at another time.
Saving traces to a file requires setting up playwright.config to save traces according to our needs, for example only on the first retry or always\use: {
trace: 'on-first-retry',
},
The saved trace.zip can be uploaded to https://trace.playwright.dev/
or used locally.
Fig.5: Files
-
Visiting test report with npx playwright show-report and going through error messages.
Fig.6: Errors
Test recorder
Playwright comes with a handy tool for fast test generation by recording every action the user does on the page and transcribing it directly into code.
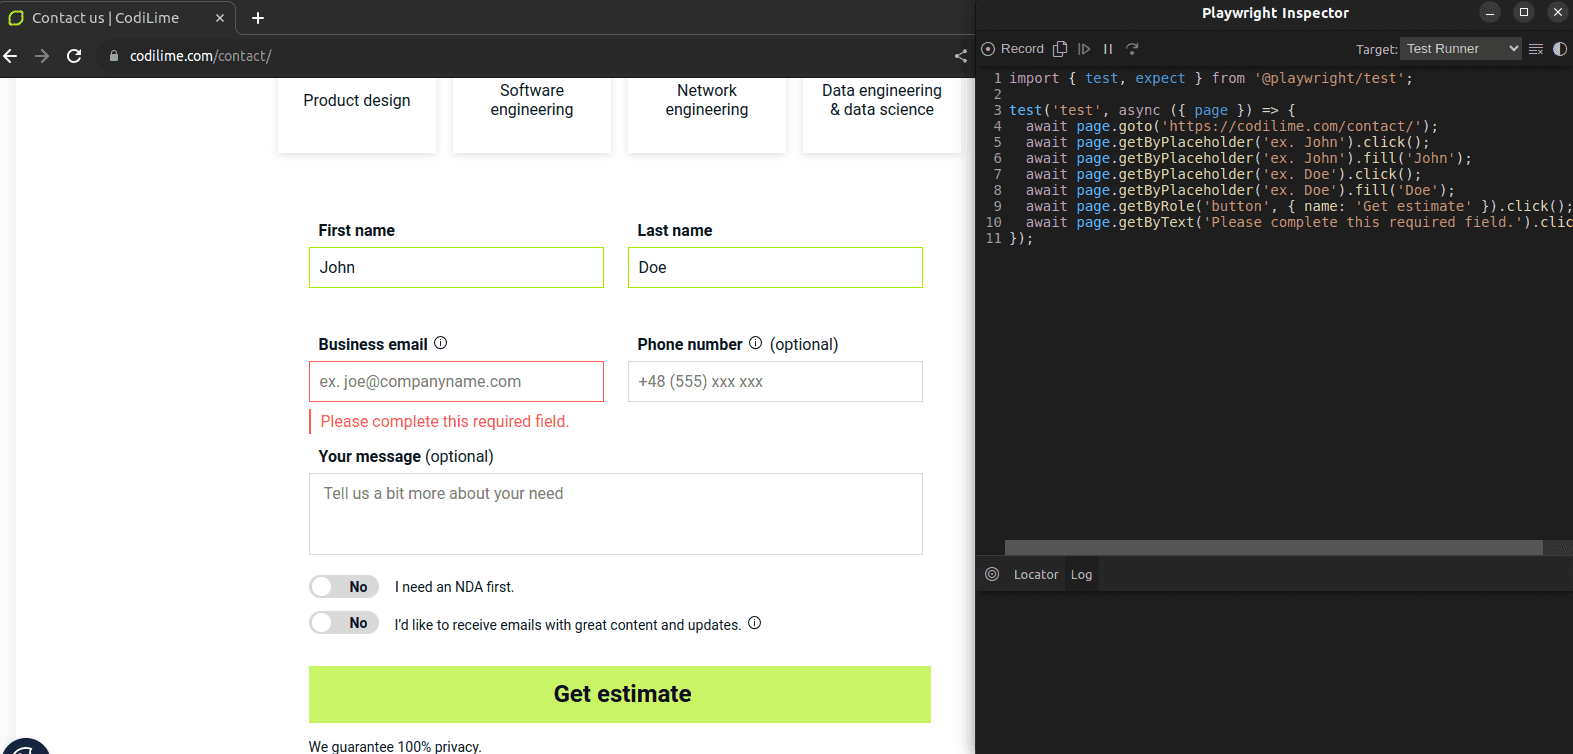
To open Playwright Inspector run npx playwright codegen https://codilime.com/contact/ which will open a new browser and an additional window with the recorded steps.
After manually going through the steps that were implemented before, inputting data for first and last names, and clicking “Get an estimate” every action on the page is printed into the Playwright Inspector allowing us to quickly prototype the desired tests.

However, because Playwright records every action that is executed on the page, the code itself contains a few unnecessary actions, like
await page.getByPlaceholder('ex. Doe').click();
await page.getByPlaceholder('ex. Doe').fill('Doe');
Normally Playwright focuses on the input field before filling it with any data, so clicking on the element itself is redundant and can be removed from the code.
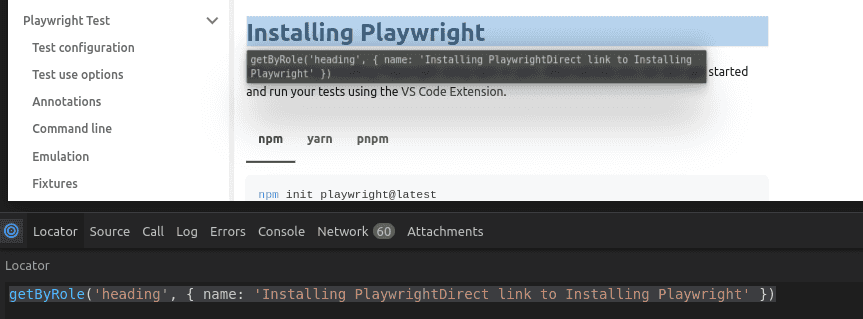
Another feature lacking is creating assertions using codegen - those have to be added after recording. On the other hand, Playwright Inspector comes with a Pick Locator tool that allows one to inspect the hovered-over element for the selector; this might not be as precise as necessary for every scenario but can definitely be used for quick scanning.

It is also possible to modify the returned selector for any other method that allows for quick verification of the new method. If it is correct, the same element on the page is highlighted.

To summarize, the test generator is very useful for fast prototyping, where we do not bother with choosing the best selectors for our elements and just want the logic to be implemented as soon as possible.
UI mode
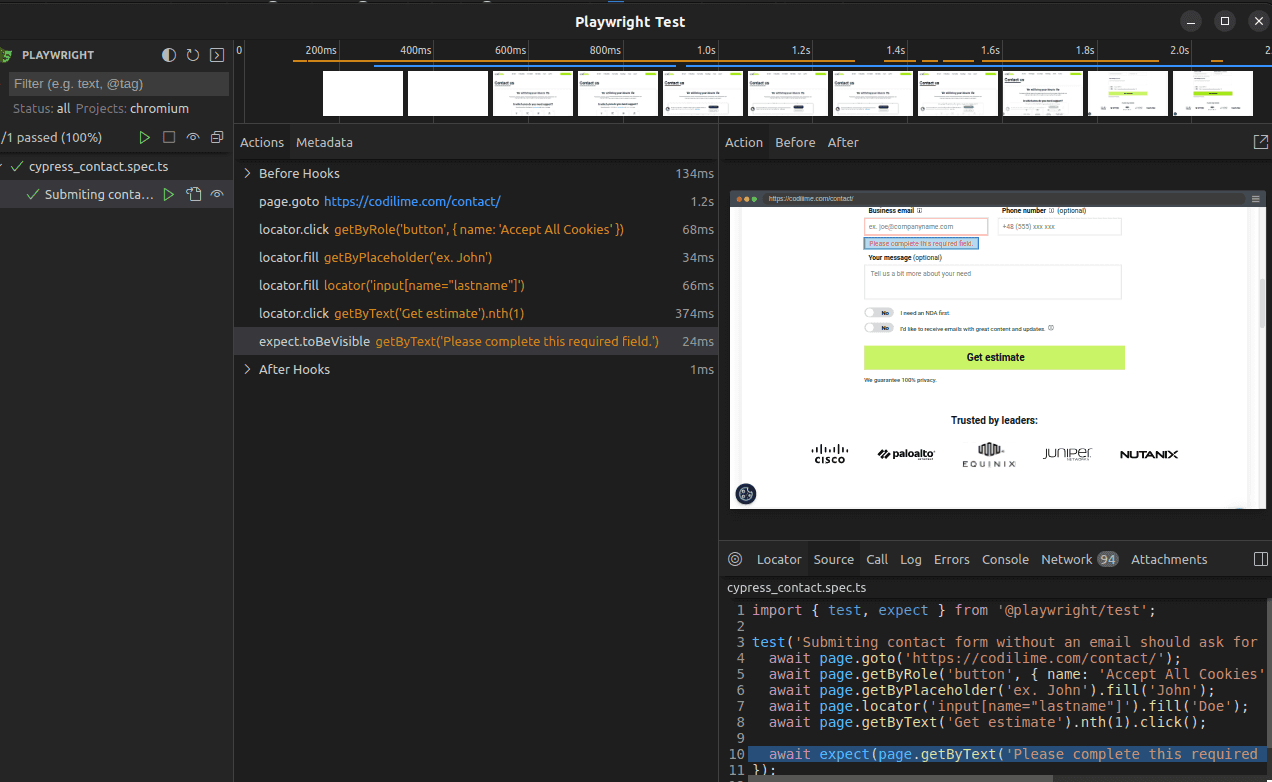
Playwright as a relatively new tool brings the best from different worlds and UI mode is an inspiration from Cypress, allowing test developers to access snippets of the browser’s state at any point in the history of the test run, making debugging and progressing with the development of new tests much quicker.
Playwright’s UI mode is a powerful tool that allows one to view in one place all created tests and run them separately. Snippets of the test run can be accessed by clicking through a list of actions or on timestamps at the top of the UI mode. Additionally, the source code of the test can be viewed;, however, modifying it from UI mode is not possible yet. Aside from that, the user has access to the most important of the browser’s dev tools, like console and network, which can be necessary for specific scenarios.

Parallel testing
Running tests in parallel can speed up the whole process by a clear margin. Playwright can be configured in many different ways to run tests in parallel.
Additionally Playwright allows further parallelization by “sharding” - splitting tests not only for different cores on a single machine but also separating them on different machines. Such an approach comes in very useful inside CI/CD pipelines, like GitHub Actions, greatly speeding up the testing process for faster feedback and continuous development.
Create a test “Submitting contact form without an email should prompt a request to fill in the email field” inside the same file, cypress_contact.spec.ts, without changing the content as it won’t be required for this demonstration. Add a configuration line under the import line.
test.describe.configure({mode: 'parallel'})
This will engage new “workers” to execute each test in parallel.
Run tests with npx playwright test

By default, Playwright utilizes half of the number of logical CPU cores as the number of workers for running tests in parallel, adjusting itself to the available system resources. It is also possible to specify the number of workers in the Playwright config file:
export default defineConfig({
workers: 3,
});
The showcased example was a very easy implementation of parallel test execution, but in more realistic scenarios some tests require the creation or destruction of data, which can interfere with other tests running simultaneously. Designing the correct flow for parallel or serial tests can be challenging.
Cross-browser testing
Support for all popular browsers on different platforms is a strong advantage for Playwright, as using third parties to cover cross-browser testing is not required. Besides the three core browsers installed by default - Chromium, Firefox, and WebKit - it is possible to install additional browsers like Chrome, Chrome-beta, MSEdge, MSEdge-beta, MSEdge-dev, and Firefox-asan.
Setting up additional browsers as well for a mobile view comes down to setting up devices in the playwright.config file:
projects: [

    {

      name: 'chromium',

      use: {

        ...devices\['Desktop Chrome'],

      },

    },

    {

      name: 'Mobile Safari',

      use: {

        ...devices\['iPhone 13'],

      },

    },

  ],
The given setup will run the same test suite twice, for both Chrome on a desktop and Safari on a mobile device.
The test report will also contain information about test results with specific tags for easier filtering and test localization.
Fixtures
Fixtures are part of every test automation tool, to establish the needed resources for each test, allowing it to have just what it requires to pass.
Playwright comes with a few predefined fixtures, the most common one is page, which allows access to the page object without setting up everything from scratch.
By adding additional fixtures, like context, browser, request, and browserName, it is possible to execute methods that are greatly different from those accessed via interaction with the user interface.
Examples of methods on fixtures that can be used besides page:
test('basic test', async ({ page, context, browser, request, browserName }) => {

    await page.goto('https://playwright.dev/'); // page

    await context.clearCookies(); // context

    const context2 = await browser.newContext(); // browser

    await context2.newPage();

    await request.get("https://reqres.in/api/users?page=2") // request

    console.log(browserName) // browserName

});
Fixtures in Playwright come as a great substitute for before/after hooks, as they are more flexible, allowing users to create the needed fixtures once and then use them everywhere as well as compose different fixtures together to create more complex behaviors.
Creating custom fixtures is definitely more on the complex side of Playwright’s features, as it requires better programming skills; however, the advantages from implementing them pay big dividends in the future, as they are easier to maintain and reuse.
An example of how even a page object model can be used in a fixture manner is explained in detail on the official Playwright page: Creating a fixture.
Global setup and teardown
For every advanced test suite, there is likely to be an element of setup to prepare the environment for executing tests in a predictable manner with all necessary data, as well as a teardown of what has been created as such leftovers could cause different behavior in future test runs.
Playwright makes this easy with global setup and teardown. All that has to be done is create and implement two files - global-setup.ts and global-teardown.ts - and configure playwright.config.ts to execute those steps: setup - before the tests, and teardown - after the tests.
  projects: [

    {

      name: 'setup',

      testDir: './',

      testMatch: 'global-setup.ts',

      teardown: 'teardown'

    },

    {

      name: 'teardown',

      testDir: './',

      testMatch: 'global-teardown.ts',

    },

    {

      name: 'chromium',

      dependencies: \['setup'],

      use: { ...devices\['Desktop Chrome'] },

    }
Project “chromium” will execute global-setup.ts as it is set as a dependency, and teardown is linked to project “setup” as its teardown, so Playwright will execute those files in the correct order: setup -> chromium tests -> teardown. The path to those files can be adjusted, here global setup and teardown were placed in the project’s root directory.
Annotations
Playwright’s annotations allow developers to deal with failing, flaky, or temporarily irrelevant tests, as well as debugging specific tests:
- test.skip() - test is not executed - marked as irrelevant.
- test.fail() - test is expected to fail; if test won't fail playwright will treat it as an error.
- test.fixme() - test is not executed - marked as failing.
- test.slow() - executes the test, but timeouts are tripled.
- test.only() - only tests with this annotation will run.
- test(“do something @smoke”, async ({ page}))=> {}) - running tests with specific tags from the terminal: npx playwright test --grep @fast.
Annotations allow additional configuration and personalization, read more in the official documentation .
Playwright’s resilience
Playwright is designed to facilitate resilient testing through a variety of features and practices:
- Auto-wait allows a test to wait for the desired element to be fully operational, the default time that the Playwright waits for the element can be modified in the playwright.config file.
- Web-first assertions automatically retry until the expected state matches, unless a timeout is reached (by default, five seconds). Generic matchers do not provide such mechanics and thus are not often used for e2e.
- Browser context provides an isolated environment for each test case.
- Test isolation, which is a consequence of browser context, prevents two different tests from depending on each other, removing failure carry-over which makes debugging easier and gives users the freedom to rearrange tests in any order.
- The Web server
feature allows starting the dev environment before the tests; this comes in handy when there is no staging environment, mostly in the early stages of development.
- The out-of-process driver is free of in-process limitations like multiple tabs or origins handling for more complex test cases.
Playwright BDD
Playwright does not come with built-in support for BDD , but with the installation of an additional library that will connect test scenarios and implementation together, it is possible. Behavior-driven development was described thoroughly in previous articles about Cypress with BDD and Introduction to BDD. This is not a 1:1 implementation, but offers a brief understanding of different possibilities.
To start using Gherkin scenarios for a given project, it is necessary to install the Cucumber library. If the project is fresh, execute at its directory npm init playwright and npm i -D playwright-bdd
Further information can be found in the official documentation, but overall it comes down to specifying .feature, and step implementation files inside of the playwright.config.ts and then, with already existing scenarios implemented, run:
npx bddgen - to transpile created files for executable code
npx playwright test - execute tests

For more details, check out the official documentation for this library.
Behavior-driven development is a very versatile approach when it comes to choosing programming languages and testing frameworks as it is a relatively popular solution across a variety of projects. Playwright, being one of the newest tools to choose for test automation, has libraries ready to be implemented.
Playwright, Cypress, Selenium
Playwright might be chosen over other testing tools due to its extensive browser support, built-in capability for parallel testing, robust API, mobile testing features, and comprehensive automation features including auto-wait, network interception, and handling of complex DOM structures. The decision could also be influenced by personal or project-specific preferences and requirements. However, Playwright is relatively a new tool, which might cause uncertainty when choosing it for larger projects; that said, being supported by Microsoft makes it more promising for the future. The following table contains a short comparison of the above tools:
| Feature | Selenium | Cypress | Playwright |
|---|---|---|---|
| Browser Support | Multiple | Limited | Multiple |
| Mobile Testing | Yes | No native support | Yes |
| Parallel Testing | 3rd party | 3rd party/paid | Built-in |
| Auto-Wait | No | Yes | Yes |
| Network Interception | With plugins | Yes | Yes |
| iframe Handling | Standard Selenium methods | No explicit method | frameLocator method for handling iframe |
Summary
Playwright is a great, modern framework for web testing and automation, offering cross-browser testing on different platforms, as well as mobile viewports. The Playwright team has taken a tried and tested approach, similar to Selenium, manipulating the browser by API calls, allowing developers to design tests for cases like file uploads, network request interceptions, new browser tabs, iframes, or shadow DOM.
With a simple architecture that does not force developers to create custom workarounds and is straightforward to use even in the most quirky scenarios, Playwright is taking the web testing scene by storm. Even though it is a relatively new tool with a small community, Playwright is here to stay, attracting developers with varied experiences, thanks to its multi-language support.


